| www.ethanwiner.com - since 1997 |
Keep Your Music PC Happy
Part 1 - Hard Drive Setup
& Backup
Essentials for Windows Computers
by Ethan Winer
This article first appeared in the July 2002 issue of Keyboard magazine
When I entered the world of audio and recording more than thirty years ago, a studio owner had to know how to align a tape recorder, solder mike cables and patch cords, and swap circuit boards if not repair them directly. If you didn't know how to do those tasks, or were unwilling to learn, you had to hire a tech to do them for you. It's really no different today. Except now, instead of aligning tape heads and fixing circuit boards, you have to know how to optimize your computer to handle as many tracks as possible, back up your hard drive to protect your operating system and audio files, upgrade a CD burner to a faster model, and install drivers for a new sound card.
The goal of this series is to help project studio owners become more self-sufficient by learning audio maintenance as it exists today. For most of us, that includes knowing how to properly set up and maintain a personal computer. I have used Windows 98SE since it came out, as well as Windows 2000 Professional and Windows XP Professional. My audio computer runs all day long, yet it rarely crashes or even misbehaves - once a month would be a lot - and that's not because I'm just lucky.
Further, I also use my audio computer for other tasks like emailing, creating web sites, scanning and graphics design, and programming with no problems. Contrary to popular opinion, there is no inherent reason why a computer that records audio cannot be used for other things too. The key is being organized: Install only programs you really need, delete invalid and obsolete data from the Windows registry, defragment your hard drives, and back up faithfully in case of disaster. By being organized and knowing how to keep your system clean and properly backed up, your computer will run better, and you'll be able to work faster, smarter, and more safely.
In this first part I will explain why it is important to partition large hard drives and show how to do it. I will also describe how I organize the partitions on my drives and discuss the two different methods I use to back up my Windows and data partitions. Future articles will explain folder and menu organization, how to optimize a Windows computer for audio and keep it running smoothly, how to troubleshoot and repair common problems, and offer tips and techniques to help you work more efficiently.
DIVIDE AND CONQUER
One of the most important ways to keep your computer organized is to divide large hard drives into several separate, smaller partitions. These days, entry-level computers come with a 30 or 40 GB hard drive, and 80 and even 100 GB drives are increasingly common and amazingly inexpensive. But storing all of your files on one large drive is like tossing all your client records for the last twenty years into one enormous shoebox. As each year passes, it becomes more difficult to find anything. This can only get worse as hard drive sizes continue to grow in the future, making it even more important to pay attention to drive, partition, folder, and file organization. I can't tell you how many times I have heard, "Help! I downloaded a program yesterday, but now I can't find it."
You can think of a disk drive as being much like an office filing cabinet. For example, a four-drawer filing cabinet is equivalent to a hard drive with four partitions. The cabinet is divided into four drawers, rather than one enormous drawer, which would be clumsy and difficult to manage. Inside each of the four drawers is a series of hanging folders, which are the same as folders located in a drive's root directory. And within each hanging folder are manila folders that contain both loose papers as well as other manila folders, equivalent to disk files and folders (sometimes called subdirectories) respectively. In addition to dividing your hard drives into partitions, or virtual drives, it is equally important to organize your folders and files in a logical manner.
Besides helping you organize your data, partitioning a drive has many other benefits. Perhaps most important, this makes it easier to back up your operating system and data independently. When everything is on one drive, it is difficult to know which files have changed since the last time you backed up. And how would you back up an entire 80 GB drive anyway - onto 120 CDRs? I don't think so! Operating system files are stored in various places on the C: drive and use names that are not obvious, so you can't be sure what needs to be backed up. Further, if an errant program installation or driver update damages Windows such that it won't even start, you'll be hard-pressed to recover your backup files at all. Finally, if you restore an entire drive from a previous backup, some of your audio and other data will be lost in the process because the older backup files will overwrite the newer versions.
The solution is to divide your hard drives based on the types of files each partition will store. I have a 4 GB partition that holds only Windows and my programs. Another 4 GB partition holds only "small data," such as word processor files, my income and expenses database, MIDI and EDL files, client web pages and graphics, drivers and programs I have downloaded, and so forth. A 500 MB partition is used for temporary Internet files, and a 2 GB partition provides temporary audio storage for programs like SoundForge and CD Creator that save and delete large files while they work. Two other large partitions hold my Acid loops and SoundFonts, so they're always available, and I don't have to handle many separate CDs.
Storing different types of files in separate partitions also lets you defragment the partitions independently. (See the sidebar Why Disk Drives Become Fragmented.) For example, the files in my Acid loops partition never change, so they don't become fragmented. But if they were on the same partition as my audio project files, it would take much longer to defragment the partition because many gigabytes of Acid loops would be shuffled around in the process. Likewise, my SoundFonts change only occasionally, when I add new files or edit existing ones. By keeping files that don't change separate from files that change all the time, defragmenting is more efficient. Further, several small partitions can be defragmented much more quickly than one large partition, even when the total amount of space is the same.
Coupled with defragmenting, using partitions also keeps related audio files physically near each other. With one large drive, even if each file is itself defragmented, the bass track could be near the center of the hard disk platter, the lead guitar near the middle, and the drum tracks scattered who knows where. And that means the drive heads must move around a lot to play back all the tracks at once. Defragmenting packs all of the files within a partition adjacent to each other, thus minimizing how far the drive's heads must travel to access them.
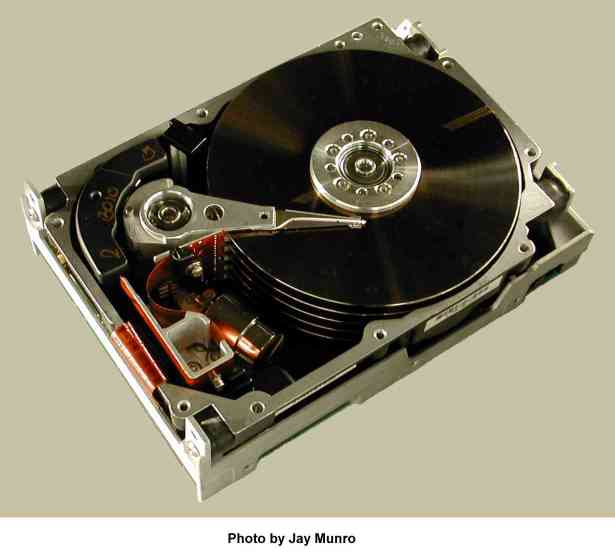
Figure 1: DON'T TRY THIS AT HOME! This 500 MB SCSI hard drive cost a fortune when new. Now it's just a really cool paperweight.
The only problem is that it's possible for a partition to start near the end of one disk platter and resume at the beginning of the next. As you can see in Figure 1, modern hard drives contain several platters - the spinning disks that store the data - and both the top and bottom surfaces are used. There is no direct way to know where on each platter a give partition will reside, so the best you can aim for is keeping all of the files for a song in the same partition and defragment that partition.
DO YOU BELIEVE IN MAGIC?
For Windows computers, the easiest way to partition a hard drive is with PowerQuest's aptly named PartitionMagic, whose main screen is shown in Figure 2. This affordable program is much easier to use than the crude (and dangerous!) FDISK utility that Microsoft includes with DOS and Windows. Figure 2 shows one of my two hard drives, which is divided into eight partitions. This screen clearly shows the entire drive, where each partition resides in relation to the others, and how much space is currently in use. Most operations are invoked by clicking the appropriate icon at the bottom of the screen.
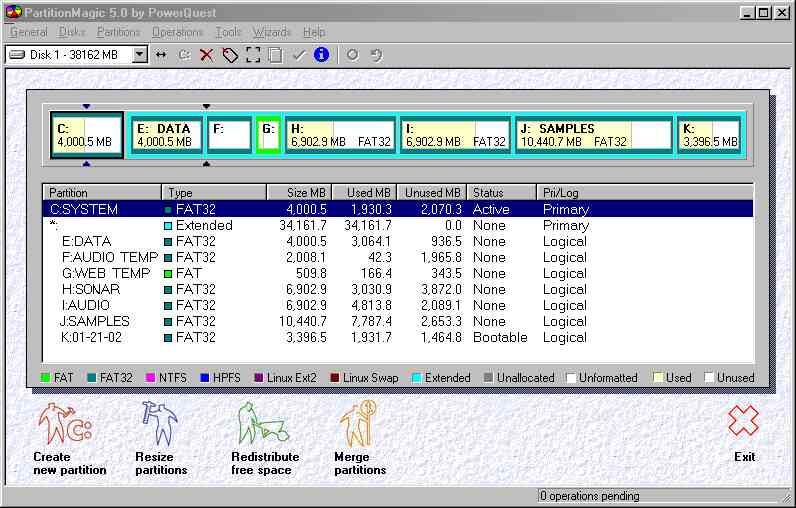
Figure 2: PartitionMagic lets you easily divide a hard drive into several smaller partitions. Besides deciding how large to make each partition, you can also set the file system type and cluster size for each partition so the drive can retrieve audio tracks as quickly as possible.
Notice that the drive letters start at C:, skip D:, and then resume in order with E:. When a Windows computer has two physical hard drives, the first partition of the first drive is always named drive C:. In most cases, the first partition on the next physical drive is assigned as D:, subsequent drive letters are assigned to the remaining partitions on the first drive, and then to the remaining partitions on the second drive. Therefore, my second hard drive (not shown) uses D: for its first partition, and the remaining partitions start at L:. Because Windows computers use drive letters - and A: and B: are reserved for diskette drives - you cannot have more than 24. This dictates how many partitions you can have altogether, since you cannot go past Z: including any CD and DVD drives.
You can learn how to use PartitionMagic by reading its manual, so I'll just point out a few useful tips.
- Before you run the program, plan on paper how you want to divide the drive.
- If you know the hard disk is good, you can save an hour or more by telling it not to test the disk every time you manipulate a partition. From the General menu select Preferences, then add a check mark next to each drive under Skip bad sector checks.
- Defragment the drive to pack the files to the front.
- Resize the (one current) partition to release the free space before creating new partitions. It is unlikely you will ever need more than 4 GB for Windows and your programs, so that's a good new size to use for C:.
- I recommend using FAT32 for all partitions, which is not the default.
- I also recommend using Logical, not Primary, for all but the first (already existing) partition.
- As you create the new partitions, be sure to uncheck all of the Take space from checkboxes. This forces PartitionMagic to use the now-unallocated space on the drive, rather than resize the partitions you created previously.
- After defining each new partition click Apply Changes, which is faster and safer than queuing up many operations and applying them all at once.
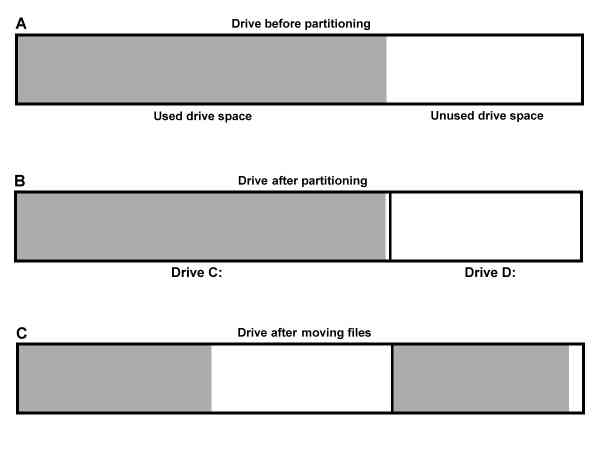
Figure 3: If you have only one drive and it is close to full as shown in A, first release the excess space, and then make a second partition as in B. After moving as many data files as will fit to the new partition (C), you can resize both partitions and copy more data files in a second pass.
If you have a large hard drive that is nearly full, you may have to partition the drive in several passes, copying only as many files as will fit each time. This is shown in Figure 3. However, newer versions of PartitionMagic have a feature to split a single drive into separate partitions and distribute selected folders among them. If you're willing to add a second hard drive, which is a good idea anyway, this task is even easier: First, install the second drive and partition it, then copy the various data folders (not \Windows or \Program files) from C: to the appropriate partitions on the new drive. Once you are satisfied that all of the files are now on the new drive, you can delete them from C:. Empty the recycle bin and defragment C:, and then release the now-free space to use for other partitions.
It's a good idea to move your temporary Internet files from C: to a separate partition because they too become quickly fragmented. My computer has a dedicated 500 MB partition just for these files, though you should not move them manually. From the Control Panel call up Internet Options, select the General tab, and click Settings. The next screen has a button that lets you move the folder to a new location. (After you move the folder to a dedicated partition, be sure to set the "Amount of disk space to use" slider to maximum.) Similarly, if you use Outlook Express, you can create a separate partition and tell it to store its files there. You are, however, allowed to move your Internet Favorites folder directly from Windows Explorer. Simply right-click and drag the entire folder from C: to your small data partition. When you release the mouse button be sure to select Move Here, not Copy Here. Now your list of favorites will be included in regular backups, along with your other non-audio data.
It is important to label your partitions using meaningful names, and Windows makes this easy to do. In Windows Explorer or My Computer, right-click on the partition's drive letter and select Properties. You can enter up to eleven characters for a descriptive label name, which lets you quickly see which partition holds what type of data. Labels also help when you back up the partitions using Norton Ghost or PowerQuest's DriveImage programs, as will be explained later.
PartitionMagic also lets you set the cluster size for each partition. (See the sidebar What are Clusters?) For non-audio drives I generally use the smallest clusters allowable for a given partition size. When you have many small files, small clusters waste less disk space than large clusters. For example, temporary Internet files are typically very small, so for that partition I set the cluster size to 512 bytes (one sector), which is the smallest possible. For partitions that hold audio files, where the percentage waste from using larger clusters is less, I set the cluster size to 32k, which helps the drive retrieve the data faster.
Added after publication: Note that partitions that reside near the outside of a hard drive's platter can be read from and written to more quickly than partitions near the center. Since partitions are allocated from the outside inward, lower-lettered partitions should be used for audio recording, and those with higher letters can be used for small data, temporary Internet files, and so forth. Of course, if your computer has only one hard drive, you'll still use C: for Windows and programs, and record audio on the D: drive.
BACKING UP IS HARD TO DO (NOT!)
Since the files on my C: drive partition change only when I install new programs or tweak my Windows settings, which is relatively rare, I back up that partition only occasionally. Recently I went to Microsoft's Windows Update web site, which recommended a new driver for my network card. But after downloading and installing the driver, my computer took twice as long to boot, and I lost the option to go into Standby mode. My last backup was a month earlier, but since nothing on C: had changed, I simply restored from that backup and all was right again 15 minutes later.
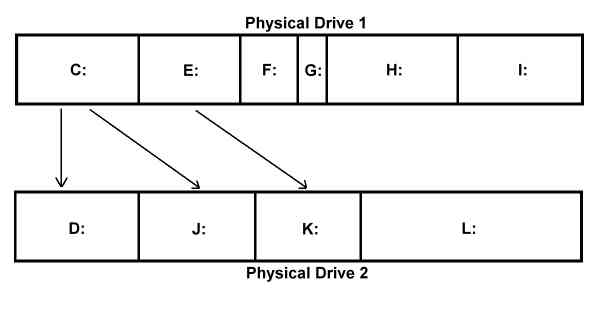
Figure 4: With two physical hard drives, you can use one as a backup for the other. Thus, if one drive dies completely, you are still protected. Notice that two partitions are set aside to hold alternating backup copies of drive C:
The most secure way to back up is with two physical hard drives. Copying files from one drive to another is also much easier and faster than burning CDRs, and since it's easier, you're more likely to actually do it regularly. The example in Figure 4 has Windows and programs on C: and small data on E:. Here the data on E: is backed up to the K: partition on the second drive, and C: is backed up alternately to D: and J: for extra safety. That is, you back up from C: to D: the first time, and then from C: to J: a month later. The next time you'll back up to D: again, which preserves the more recent backup on J:. If next week you discover that something had trashed Windows before you backed up, you still have the more recent copy to restore from. Otherwise, you'd have overwritten your only good backup with what you now realize is corrupted!
I'm probably more careful than most people, so besides copying Windows, programs, and data to a second drive, I also have a network server in my basement for backups. Plus, I give CDRs to two friends in case my house burns down or a lightning strike takes out all the computers at once. This concern with failsafe backups may seem a bit compulsive, but it really isn't unreasonable. Whether these are just your own casual tunes or commercial projects using expensive musicians, a few minutes spent backing up is cheap insurance indeed.
I back up my non-system data with DirPrudence ($15 shareware). This terrific utility is designed specifically for maintaining parallel copies of files on different drives. You tell it the source and destination drives or folders, click Compare, and it shows you all files - even within subdirectories - that need to be copied to make the backups current. Another button then copies the files you select.
[Added June 3, 2005:] DirPrudence is no longer available, but there's an even better program called SyncBack that I now use. The full version is inexpensive, and there's also a freeware version that's very capable:
www.2brightsparks.com/syncback/syncback-hub.html
I record mostly my own small projects, so I don't generate a lot of large audio data that needs to be backed up. I use DirPrudence to copy my audio files to the network server, and also burn them onto CDRs. For commercial work I keep the files on my hard drive and save backups on the server and CDRs. Once the client has received the data and audio CDs, I delete them from my hard drives and file the CDR copies. But for commercial studios that shuttle a lot of data in and out of the computer every day, a different approach is needed.
Now that a large hard drive costs less than a reel of two-inch tape, it makes sense to use a removable drive bay and just sell or rent your clients a hard drive. If you store the working files on the computer's hard drive, you can copy them to a removable drive and delete the originals. Better, copy to two separate removable drives for extra safety, keeping one on-site and letting the customer hold the other. Of course, for single songs and other small projects, one or two CDR backups is adequate. Now that high-speed CD burners are very affordable, you can back up 700 MB in less than five minutes.
I'm not a fan of tape drives for backup because I don't trust digital tape's longevity. I've seen too many DAT tapes develop errors after only a few years. Also, tape drives are expensive, they use a proprietary format, and it's a nuisance to browse for and recover one file.
THE GHOST IN THE MACHINE
Earlier I mentioned the problem of backing up large amounts of data onto CDRs. CDRs are useful for backing up small data and audio files for one or two songs, but not for Windows and programs. One problem is that many Windows files are purposely hidden and have read-only or system file attributes. If you were to restore from a CDR after a calamity, all of the files from the CDR will be set as read-only, and Windows would not be able to write to them. The only reliable way to back up the entire state of your C: drive is with Norton Ghost or PowerQuest's DriveImage. These programs let you make an exact clone of C: on another partition. If anything goes wrong, you can easily restore it to a previous state.
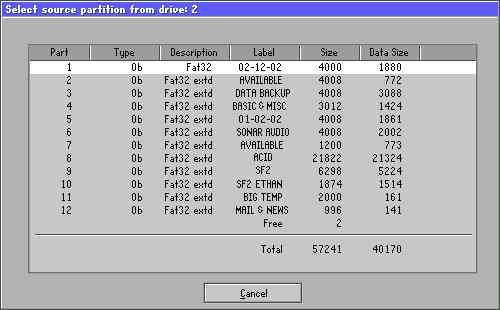
Figure 5: Norton Ghost lets you select which partition to copy from and which to copy to. Ghost runs in DOS mode, so you'll need partition labels to keep track of what gets copied where.
I use Ghost, part of Norton SystemWorks Professional (under $100) which contains many other useful utility programs. As with PartitionMagic, I'll just offer a few tips:
- Label your partitions with meaningful names, since that is all you'll see in Ghost. I use "System" for my C: drive, but after cloning to another partition, I change the name to today's date as shown in Figure 5. The next time I run Ghost I'll know which alternating backup is older and can be overwritten.
- You must run Ghost from plain DOS, not from a command prompt within Windows. Windows 98 lets you restart in DOS mode, but later versions have no DOS mode. Therefore, you'll need to create a boot diskette using the Ghost Boot Wizard, put that diskette in drive A:, and restart your computer before running Ghost. Added after publication: Windows XP has an option to format a DOS boot diskette, which you can use to restart in DOS mode to run Ghost. Place a diskette in the drive, right-click on the A: icon in Windows Explorer, select Format, and then check the box titled Create an MS-DOS startup disk.
- If you use Windows 98, I suggest you copy the Ghost program from where it was installed to your \Windows folder. When you restart in DOS mode, that will be the current folder. With newer version of Windows and a Ghost boot diskette, Ghost will already be on the diskette so you can run it from there.
- Be careful! When you see the final "Are you sure?" prompt, review the source and target drives and partitions one more time before pressing Yes. Added after publication: In particular, please be careful to distinguish between writing to one partition on a drive and writing to the entire drive. If you tell Ghost to write to the entire drive - either when backing up or restoring - any additional partitions on the target drive will be erased, and all you'll be left with is the one partition you just wrote.
Since the whole point of Ghost is to back up your system and programs files, you should always use it before installing new programs or drivers, unless nothing has changed since the last backup. I prefer saving my C: partition to another partition, rather than have Ghost save a single Image file. With a separate partition, you can run DirPrudence to see what has changed, in case you have to restore from an old backup and there are newer files on C:. With an Image backup file, you need the Ghost Explorer program to see all the files, and you can't directly compare them with what's now on C:. However, you can expand an Image to an unused partition and compare the files from there.
Added after publication: Lately I have been using Ghost Image files more. One advantage is you don't need to dedicate an entire partition as a backup of your C: drive. Now that 80+ GB drives are so affordable, you can save many different backups in one partition or drive, and restore to any of those previous states.
I also use PC Magazine's free TreePrint utility to save text files showing the folder structure of my partitions. I have a lot of data organized very specifically, so if a hard drive dies and I have to reconstruct it from backups, these text files will remind me what goes where. I save separate files (DriveC.txt, DriveE.txt, etc.) in a \TreePrint folder on my small data partition, so they are included in my routine backups.
In this article I described how partitioning your hard drives helps you to be better organized, and also simplifies defragmenting and backing up your system and data files. The next article in this series will explain more about program, file, and folder organization, and present a number of Windows tips to help you to work faster and smarter.
SIDEBAR: Why Disk Drives Become Fragmented
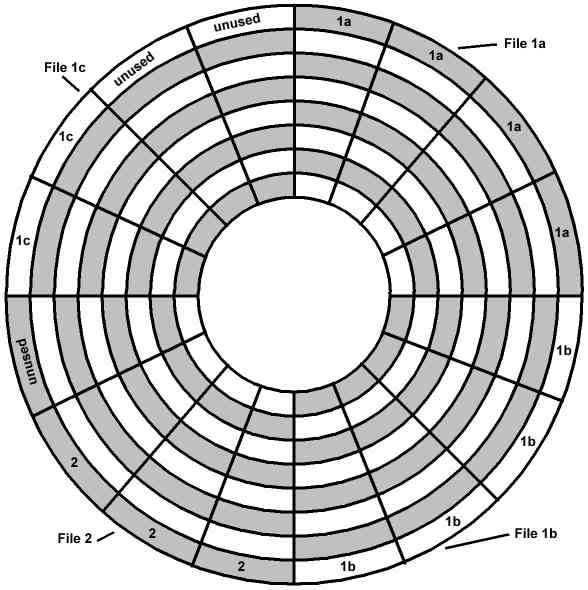
Figure 6: Files are saved on disk starting at the first available cluster. As some files are deleted and others extended, different parts of one file can end up in various places around the disk.
When you save a file, Windows finds the first available cluster and saves it starting there. If the file is smaller than one cluster, only sectors that are actually needed are filled. The rest of the cluster will be used if you extend the file later by saving a longer version, but if it extends past that cluster, another will have to be found. Depending on what other files have been since saved, the next available cluster may or may not be adjacent.
Figure 6 shows a file that was saved initially in two adjacent clusters, identified here as File 1a and File 1b. Later, a different file was saved in the next adjacent cluster, since that was the next one available. Then, File 1 was saved again, but since it is now longer, a new cluster had to be found. As you can imagine, with all of the file saving, extending, and deleting that occurs on a computer drive, it doesn't take long for many of the files to become fragmented.
The problem with disk fragmentation is that files take longer to read if their pieces are scattered around the drive. Disk drives are mechanical devices, and the drive read/write heads must be moved to the correct place in order to read the data. Therefore, reading a file in a continuous stream from adjacent sectors is faster than reading a fragmented file. A disk defragmenter rearranges files so all of their sectors are contiguous.
I recommend that you defragment your audio drives before every recording or mixing session. Just as it takes longer to read a file that is fragmented, it also takes longer to allocate space for a Wave file being recorded if Windows has to store it in bits and pieces using whatever available "holes" can be found on the disk. Before defragmenting, you should also empty the recycle bin, and if you have Norton Utilities, empty the Norton Protected Files. This frees up abandoned space on the drive, making defragmenting go faster because fewer files have to be relocated.
SIDEBAR: What Are Clusters?
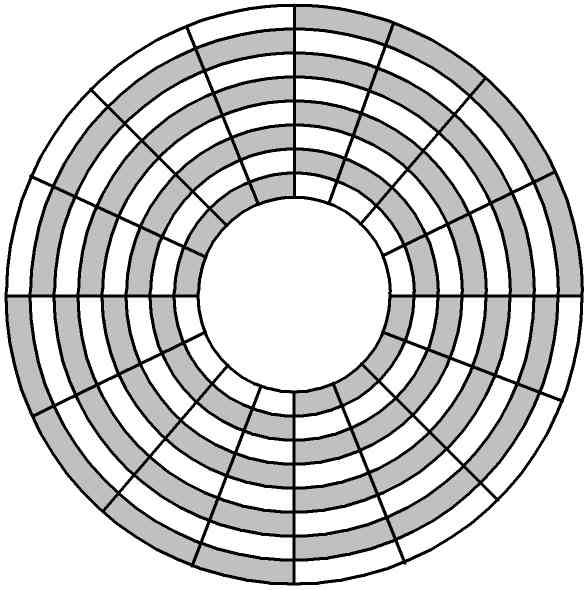
Figure 7: Disk sectors - each holds 512 bytes - are grouped into units called clusters, shown here shaded in gray. The number of sectors in each cluster determines how efficiently the data is stored and, for large files, how quickly it can be retrieved.
Every computer disk is comprised of many individual 512-byte sectors. For example, my 60 GB Maxtor drive has 117,231,408 sectors. To make such a large number of sectors easier to manage, Windows groups several sectors into a single unit called a cluster. For most versions of Windows, a cluster can be as small as one sector and as large as 64 sectors, with larger disks having more sectors in each cluster so there are fewer clusters to deal with. Figure 7 shows a disk drive organized with four sectors in each cluster. Besides making large drives easier to navigate, clusters also help the operating system retrieve data more quickly.
Reading data from a hard drive is a multi-tiered process. When a program asks Windows to read a file, Windows determines which cluster contains the file and passes the request on to the BIOS. The BIOS then tells the hard drive controller to seek to the proper sector and retrieve the data. At least one cluster is retrieved, even if a program asks for only a few bytes. Therefore, using larger clusters reduces the number of times the hard drive has to physically position the heads to the proper place on the disk, even when a program requests data in many small pieces. The first request grabs a full cluster and stores it in an area of memory called a buffer, and subsequent requests can read the rest of the cluster directly from memory.
Since Windows accesses disk drives by cluster numbers rather than by individual sectors, one cluster is the smallest unit that can be allocated to hold a file. So a readme.txt file that is only 50 bytes long must allocate an entire cluster, and the remaining space in the cluster - called slack - will be unavailable for anything else. When the clusters contain many sectors and most of the files are very small, you can end up with more disk space wasted than used. So for drives that contain mostly small files, it makes sense to use small clusters. But for drives that hold audio files, large clusters allow the data to be read more quickly because more sectors are read from the disk at a time.
Added after publication: Reducing wasted disk space is yet another reason to divide a large hard drive into several smaller partitions. With a single 80 GB partition, the smallest possible cluster size is 32k.
Ethan Winer is a consultant who specializes in configuring Windows-based computers for audio recording. He also plays the electric guitar and bass, and is principal cellist for the Danbury (Connecticut) Community Orchestra.
Entire contents of this web site Copyright © 1997- by Ethan Winer. All rights reserved.