| www.ethanwiner.com - since 1997 |
Creative Labs Audigy
Sound Card
Review and Tutorial by Ethan Winer
November 15, 2001
Important Note:
At the end of June, 2002 I bought a new computer and decided not to install my Audigy card. The Audigy has been plagued with bugs since it was first released, and although my contacts at Creative Labs promised all of the bugs would be fixed by the end of 2001 that never happened. (You'll read about these bugs later in this article.) Therefore, I have joined the legions of former Creative Labs customers who have jumped ship over the past half year, and the SB Live that came with my new computer now serves only as a MIDI metronome for Sonar.
Instead of the Audigy I'm using the LiveSynth Pro DXi software sampler to play SoundFonts. Although LiveSynth Pro has a few bugs of its own, they are not as crippling as the Audigy bugs so I can still get work done. Further, using a plug-in software sampler opens up several new capabilities not possible with an Audigy or SB Live. Most important, I can apply different effects, like EQ, to each instrument by using more than one instance of LiveSynth Pro. Although LiveSynth Pro requires the CPU to work harder than does a hardware sampler like the Audigy, this is no longer an issue with modern fast computers.
Part I: The Audigy Experience
I bought my first SoundBlaster card, an AWE 64 Gold, in 1997. I had left the recording field a dozen years earlier to start a software company, and when I retired from that in 1992 to get back to audio and music, I quickly learned that the entire audio industry had changed. MIDI had matured, and the ADAT was about to revolutionize digital recording by making it affordable to the masses. More important, samplers were emulating real instruments far better than the old Moog-style synthesizers I had used years before.
When I upgraded to a Pentium-200 MMX computer five years later in 1997, my friend at the computer store convinced me to also buy the brand new AWE 64 Gold. The AWE 64 came with 4 MB of on-board memory, though I had no idea how that could be useful! When I discovered the SoundFonts CD included with the AWE 64, it all became clear. I immediately added an 8 MB expansion card - the largest available at the time - for a whopping 12 MB total. Soon after I discovered the Vienna SoundFont editor, and I was hooked.
Since then I have become a vocal supporter of the SoundBlaster Live card, contributing tips and advice in audio newsgroups and web forums. In 1999 I wrote a feature article for Recording magazine showing how to build SoundFonts from scratch using Vienna. Soon after I wrote Striving for New Lows for the online magazine ProRec explaining how I improved my studio by replacing a rack full of outboard gear and seven synthesizers with just a computer and software. A SoundBlaster Live was the core of my new setup.
The Audigy Platinum eX has now replaced my SoundBlaster Live card, and it has proven to be a most worthwhile upgrade. First I'll explain why the Audigy is a big step forward, and in Part II that follows I will describe in detail what is perhaps its most important new feature: Modulator Routings introduced with the SoundFont 2.1 specification. Since I'm not a gamer, many of the Audigy features - like EAX presets, environment morphing, 3D effects, and most of the bundled software (which I did not install) - are of little interest to me. As a musician and recording professional, all that concerns me are audio fidelity and features. These will be the focus of this review, though I will not dwell on the published specifications available at the Creative web site. Rather, I will describe using the Audigy in a professional audio setting.
First impressions
The Audigy Platinum eX is a formidable package. It includes the main PCI sound card, an extension card that requires a rear computer opening but not a PCI slot, an external "Drive" box, and six connecting cables. Unlike the SB Live, the Audigy includes additional audio and MIDI inputs and outputs, as well as a FireWire port. The directions were clear and easy to follow, especially considering the number of boards and cables involved.
Assembly and installation went smoothly, and everything worked immediately when I powered up my computer. I did have one problem, which would have been avoided with better instructions. During the course of loading the Audigy software, Setup asked for my Windows 2000 CD, which it needed to install the FireWire drivers. But then I got the message "Error reading CD-ROM" claiming the CD was damaged. Eventually I realized all that was needed was to insert the Audigy CD again so Setup could finish.
Mikey likes it - a lot!
The first thing I noticed about the Audigy is the complete lack of background noise. As in, "Is this thing on?" The relatively high level of hiss was my single biggest complaint about the SoundBlaster Live card. In fact, the one piece of outboard gear I had kept from my old rig was a DOD noise gate, just to kill the Live's hiss when music wasn't playing. I like to listen loudly when tweaking a SoundFont, to clearly hear the changes I make. Now I can create and audition SoundFonts in Vienna - without the noise gate - and when I stop playing, the background is truly silent. To test the synthesizer's residual hiss level, I recorded a short MIDI file into SoundForge; when the music stopped, the meters dropped to -84 dB.
I consider this pretty good for a 16-bit sampler, and it surpasses the SB Live by at least 10 dB. Please understand this is not a scientific test because I did not include weighting, which gives a more realistic measure of the actual audibility of the noise. Without applying the standard A or C weighting curves, all frequencies components of the noise are considered equally in the measurement. Weighting applies an EQ curve to take into account that noise in the midrange is more audible than noise at the highest and lowest frequencies. So in a real test the Audigy synthesizer's noise will likely measure even lower than the -84 dB. I observed.
Just as important to me is the Audigy's greatly improved use of memory for SoundFonts. With the SoundBlaster Live, you are allowed to use no more than half of your computer's memory for SoundFonts. My computer has 512 MB of RAM, and the arbitrary limit of 256 MB was short-sighted and foolish. It is possible to edit the Windows registry to remove that limitation, but why should you have to do that? Now with the Audigy, I can move the memory slider all the way to 479 MB. Of course, the memory is not taken from Windows until you load some SoundFonts, so you lose nothing by setting the slider to maximum and leaving it there. But it gets even better.
As you probably know, Wave files are the basis for all SoundFont instruments, and those Wave files are contained in the SoundFonts you load from the SoundFont control panel. The SB Live can play only 32 MB of Wave file data at one time, and that is further limited when using large SoundFonts. If you have loaded one or more SoundFonts that occupy, say, 60 MB of memory, the SB Live can play only the Wave data that lies within a contiguous 32 MB block. If you play an instrument that happens to lie near the beginning of SoundFont memory and then play a different patch near the end of the memory block, a "hole" develops and some instruments or notes will no longer play. The Audigy solves this by allowing a contiguous 4 GB "memory window" that the MIDI synthesizer can access all at once.
Another important new Audigy feature is Modulator Routings, which were introduced with the new SoundFont 2.1 specification. I'll describe Modulator Routings fully in Part II that follows, but briefly, you can now adjust all the parameters of a SoundFont instrument in real time using standard MIDI controllers. With the SB Live card, you can control only a few instrument parameters - like pitch bend and modulation amount - with the knobs on your keyboard while you play or from a sequencer. To change other parameters, such as filter cutoff frequency, LFO speed, and ADSR values, requires sending a complex (and undocumented) sequence of MIDI controller data. Worse, many parameters cannot be adjusted at all, and many standard MIDI commands like channel pressure - sometimes called aftertouch - or a breath controller are ignored. The Audigy solves all this by letting you control any parameter with any controller.
I also like the new outboard "Drive" box with all the additional inputs and outputs. Unlike the older APS panel that takes up a drive bay on your computer, this box is completely separate and can sit on top of the computer or on your desk. Besides the standard audio and MIDI connections on the PCI card, the drive box adds an extra set of MIDI inputs and outputs (not just the same connections duplicated) and another audio input. This not only frees you from climbing behind your computer every time you want to connect an alternate audio or MIDI device but also lets you keep several devices connected at the same time. The headphones jack with separate volume control is equally convenient, and the regular RCA and lightpipe SPDIF connections are welcome as well. I don't need the FireWire port at the moment, and I have no way to test it, but I will surely use it in the future.
Since I don't use any VST host programs, the new ASIO driver is not that important to me. But many people do require ASIO, and will definitely find this feature useful. I was not able to test Creative's claim for 2 millisecond ASIO latency, but I did try an ASIO-compatible software synthesizer and can tell you that the response time was instant.
Another new feature that may interest some folks is the ability to play back at higher sample rates and bit depths. Note that these are available only for playback, and recording is still fixed at 48 KHz. and 16 bits. Call me a dinosaur, but I happen to think CDs sound great. It is true that higher bit depths are important when used internally in a recording program, to minimize the distortion caused by rounding errors when changing volume or applying plug-in effects. But it's easy enough to record at sensible levels, and using 44.1 KHz. at 16 bits avoids the wasted disk space and CPU usage when recording with the extended formats. Even though the Audigy operates internally at a fixed sample rate of 48 KHz., I heard no degradation caused by sample rate conversion when recording or playing back at 44.1 KHz.
And now for the flaws
As you can tell, I love this card. Between the greatly improved dynamic range and ability to load and play SoundFonts as large as available memory, the Audigy is a major step up from the SB Live it replaces. I do have some minor quibbles to report, as well as three potentially serious bugs. After you install the Audigy, an animation runs every time you start your computer, which I find obnoxious and intrusive. You can get rid of it, but Creative should make it clearer how to do that. Worse, the documentation is seriously lacking. There are several important changes that former owners of the SB Live need to know about, and none were mentioned at all.
For example, the "A" and "B" synthesizers can access different SoundFont banks, but that means you must now load each synthesizer bank separately. I wasted a day trying to figure out why MIDI tracks sent to the "A" synthesizer sounded as intended while everything sent to "B" played as a piano. I use Thomas Hammer's excellent SF2Load freeware program to automatically load different combinations of SoundFonts, so I asked his advice. Thomas explained that the Audigy is configured as two separate devices, so I should specify which SoundFont device to load. Once I repeated the commands to load all my SoundFont files to Device 2 as well as Device 1, everything worked as expected. (Even though you load the same files twice, additional memory is not taken.)
Nowhere in the Audigy manual or Help files is there any explanation of the improved use of SoundFont memory. In fact, SoundFont memory was never explained in the SB Live manuals or Help either. A SoundBlaster Live can load SoundFonts that occupy up to half your computer's memory, and it can play up to 32 MB of Wave data at one time. The Audigy can use all of your computer's available memory, and access Wave file data that occupies as much as 4 GB. But none of this is explained anywhere, and it should be. Further, there is no mention of the important new Modulator Routings feature except in Vienna's Help, and that is lacking any real explanation or examples. To confuse things further, the new Vienna with SoundFont 2.1 support is still called version 2.3!
While my previous complaints are merely annoyances, I also found three real bugs. Creative Labs told me these problems will be fixed in the next driver update, and promised it will be released before the end of 2001. [As of April 1, 2002 these bugs still have not been fixed.]
1. In some cases looped samples are not handled correctly, and exhibit varying amounts of clicking on the Audigy each time the sample loops. If you play the same SoundFont on a SoundBlaster Live card, the loops play properly, and if you export the raw Wave files and play them in an audio editor, such as SoundForge, they loop properly there too.
2. When a sequence is playing many instruments at one time, notes will sometimes stop playing prematurely. I noticed this on a MIDI file that had many cymbal crashes. Instead of sustaining, the cymbals kept cutting off abruptly. If I muted the keyboard track, the cymbals then sustained as intended. This is not simply a matter of exceeding the Audigy's maximum polyphony because the same sequences play properly on a Live card.
3. When more than one layer is used in a SoundFont Instrument, one of the layers may sound in the wrong octave. My test SoundFont has two stereo Wave files that play at the same time as overlapping layers. The Instrument and corresponding Preset play correctly in Vienna, but when loaded into memory and played from a sequencer, one of the layers sounds two octaves too high.
4. [This is a new serious bug recently discovered and added April 15, 2002]: Some SoundFonts play all notes at full volume, ignoring the MIDI note-on velocity (how hard you actually hit the key).
Review Summary
Is this card capable of pro audio quality? Most definitely. Audio playback sounds identical to my Delta 66 sound card, except the Audigy doesn't make a popping sound every time I press Play in my multi-track recorder program as the Delta does. With its additional line input, and additional SPDIF and MIDI inputs and outputs, an Audigy can serve as your only sound card unless you need to record more than two tracks at one time. Sometimes I do need to record multiple sources to separate tracks at one time, so I'll keep my Delta 66. But I have had no problem using both cards at the same time.
Part II: Modulator Routings
When praising the SoundBlaster Live, I often tell people it contains 95% of the features of a $2,000 hardware sampler, but for a lot less money. Now with the Audigy and its support for Modulator Routings, that figure is more like 99%. All that's missing is an option for high- and band-pass filter modes, and the ability to change the filter slope from 12 dB. per octave to 24 dB. per octave. In truth, the Audigy is much better than any hardware sampler because it uses your computer's hard disk and memory, and you can edit instrument parameters using Vienna on a real video monitor instead of a squinty little LCD display. Plus when you upgrade your computer, you also upgrade your sampler at the same time for free.
Before the SoundFont 2.1 specification, only a few MIDI parameters could be altered while playing a MIDI instrument live or from a sequencer. For example, you could edit a SoundFont to establish the vibrato speed when modulation (the "Mod wheel") is applied, but the speed itself was fixed and stored permanently within the Instrument or Preset definitions. All you could change with the Mod wheel was the amount. There was no way to change the vibrato rate or other important parameters while playing an instrument. As you are about to see, the Audigy overcomes this limitation. Let's take a closer look.
One of the most important features in a sampling synthesizer is the ability to define a relationship between note-on velocity - how hard you press the key - and the initial low-pass filter cutoff frequency. Nearly every musical instrument responds naturally to changes in velocity: The harder you blow a trumpet or clarinet, the brighter is the tone. Likewise for bowed and plucked instruments like the violin and guitar. The inability to control such a fundamental relationship with SoundFonts has always been a sore point for me, and was an important omission when trying to make sampled instruments sound realistic.
The Vienna SoundFont editor that comes with the Audigy lets you control all aspects of sample playback, including changing the filter in response to either note-on velocity, volume control messages (CC 7), or both. Responding to volume changes as well as note-on velocity is important for creating realistic swell effects with brass and string instruments. Unlike a piano or snare drum where every note always goes through a predictable attack and decay cycle, sustained instruments can change their volume while a note is held. And to make those volume changes sound more realistic, a sampler must be able to duplicate the same natural relationship between volume and tone color possessed by the acoustic instruments it is emulating.
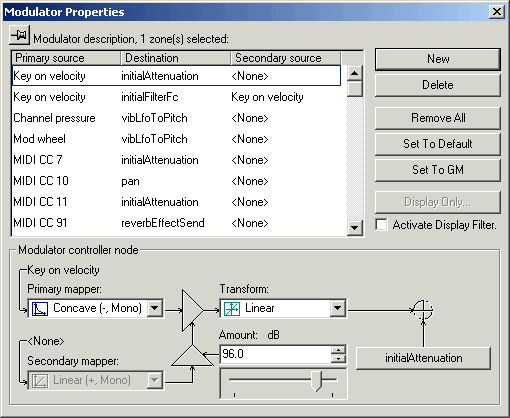
To add or edit modulator routings to a new or existing SoundFont, open the Instrument list in Vienna and add a Global Zone if one is not present. Although you can establish different parameters for every sample within an instrument, it is more common to define them once and have the same settings apply to all of the samples. Otherwise, you'd have to set them repeatedly for every sample. Note that you can control all parameters, not just modulators, in the global zone. Now right-click on the global zone and select Modulator Properties to call up the modulator editing window shown in Figure 1 below.
Figure 1: The Modulator Properties Window
Note the little push-pin icon at the top-left corner of the screen. This enables a "stay on top" mode that keeps the Modulator Properties screen visible as you switch from zone to zone. Otherwise, the screen goes away every time you click outside its window.
All of the available modulator sources and destinations are displayed in this screen, and you can determine which modulators affect which parameters and by how much. Understand that modulators are MIDI controls and commands, such as the Pitch Bend wheel, sustain pedal, and the Reverb Send knob on your sequencer. These appear in the Primary and Secondary source columns. The Destination column shows which instrument parameters are to be controlled, for example, volume, filter cutoff frequency, pan position, and vibrato speed. Each destination can be controlled by as many as two sources (Primary and Secondary), though you can add more control routings if you want. For example, you could have the vibrato speed become faster as the volume is increased, and also as the pan position is moved farther to the right, and also as the notes you play on the keyboard go higher in pitch.
Unless you have already added new modulator controls, the list now showing reflects the standard set. For example, Key on velocity is set to control the volume of each note, MIDI Pan messages (CC 10) control the current left/right placement, and the Mod wheel is assigned to control how much the pitch is varied by the Vibrato LFO (Low Frequency Oscillator). These relationships are standard on all synthesizers, so pressing the key harder results in louder notes, changing the Pan Pot moves the instrument between the left and right speakers, and increasing the Mod wheel yields more of a vibrato effect. But besides establishing which controllers affect which parameters, you can also determine by how much and what transfer curve is used.
Linear Curves
Most MIDI controllers use a linear transfer curve. This means that as a knob or slider is adjusted, the result corresponds directly to the amount of that adjustment. For example, if the Pitch Bend wheel has the normal range of two semitones and you move it exactly halfway up, the pitch will increase by exactly one semitone. And as you move the Pan Pot smoothly from the center to the right, the sound being panned should move in a corresponding fashion.
If you've spent much time using Vienna, you probably noticed the Scale Tune setting. This lets you control the relationship between the notes you play and the pitch of the notes when they sound. The normal setting is 100 cents, which means for successive notes on the keyboard the pitch changes by one semitone. You can also specify a smaller change to, for example, have finer control over the pitch of a kick drum. If the Scale Tune is set to 17 (about 1/6th of 100), the pitch changes by only a whole step as you play notes that span one octave. This lets you play notes closer together in pitch than the standard one semitone to get tunings in between the half steps and thus achieve finer control. However, this is still a linear relationship, since the amount by which the pitch changes - one whole step per octave - remains constant across the entire keyboard.
Nonlinear Curves
It is also possible to define nonlinear curves, such that the change becomes more or less pronounced at the upper or lower extremes. Four types of curves are available - linear, concave, convex, and switch - and all have four variations: single or double polarity, and positive or negative polarity. I'll describe each of these parameters in turn. The concave and convex curves in Figure 2 below were captured from Vienna's Help file and are shown here to help support the descriptions that follow.

Figure 2: Concave and Convex Controller Curves
These drawings show how the modulation destination is affected by different amounts of change in the source controller or command.
If you select a concave curve, the controller has less effect at low values than at high values. Convex curves are the opposite and do more at small values and less at the extremes. In Figure 2 above, the amount you change the controller source is shown by the right-facing arrow, and the degree of influence the controller exerts on the destination is shown by the arrow pointing upward. So in the first example in the upper left corner, when a controller source, such as the Mod wheel, is turned halfway up (the arrow facing to the right), the result (going upward) is only about 1/5th the maximum possible. But as the controller approaches its limit, small increases to the right apply a much larger change upward.
One good use for a concave curve is when using the Pitch Bend wheel to alter tuning. With a concave curve, small movements near the center of the wheel's travel will have very little effect, making it easy to apply small changes to the pitch. This is ideal for using the wheel to add vibrato manually, to have better control over the pitch change. If you instead set the curve to convex, small changes near the center of the wheel's travel result in large changes in pitch that are harder to control. And as the wheel approaches the upper or lower limits of its excursion, the change in pitch becomes less.
The switch "curve" (not shown here, see the Vienna Help file) isn't really a curve at all, since it has only two states: on or off. One example of a switch controller is the sustain pedal. When the pedal is pressed, it sends the maximum allowable value of 127; when you release it, a value of 0 is sent. If you specify a switch curve for a normal controller, such as the Modulation wheel, nothing will happen when you move the wheel a little bit. But once you've moved it more than halfway (a MIDI value of 64 for most controllers), the vibrato will suddenly switch in and be applied at the full value specified by the Amount field.
The next parameter is polarity, which can be either unipolar (called Mono in the Modulator controller node Mapper field) or bipolar. Many of the controller examples I have described so far are unipolar, which means the amount of their influence ranges from zero to full as the wheel or slider travels from minimum to maximum. The Modulation wheel works this way, as do the volume control and sustain pedal switch. One example of a bipolar controller is the Pitch Bend wheel. This is bipolar because it can make the pitch higher or lower, depending on which direction you move the controller away from its center position. The pan control is also bipolar, since it can move an instrument from the normal position in the center to either the left or right. However, you can change any controller to be either unipolar or bipolar, regardless of whether its normal resting position is minimum or in the middle.
The last parameter is a different kind of polarity, referred to as "+" (positive) and "-" (negative) in the Modulator Properties window. A positive polarity is more usual, since you probably want the amount of vibrato to increase as you push the Mod wheel forward. But you can just as easily reverse the polarity of a controller. If you change the Pitch Bend wheel from a positive linear curve to negative linear, the pitch will go flat as you push the wheel forward and sharp as you pull it closer to you! To complicate things further - or allow more control, you decide - you can also reverse the polarity by using negative values in the Amount field. So if you make the Pitch Bend wheel work in reverse as described above, you could then convert it back to normal by setting the Amount to a negative value instead of a positive one.
So what can you do with all this new-found power? Besides the obvious routing of velocity and, optionally, volume to filter cutoff frequency, you could make the Modulation wheel increase not only the amount of vibrato but also the vibrato speed as you turn up the knob. Or you could use a positive bipolar linear function to have note-on velocity affect the pan position, so notes played softly come from the left speaker, and as you play harder, the notes will move toward the right speaker. If you instead use a positive bipolar switch, notes having a note-on velocity of less than 64 will be panned hard left while notes above that level will instead be panned hard right, with nothing in between. Of course, this assumes the initial pan setting is in the center, and the Amount is at maximum. For smaller Amount values the notes will still switch suddenly from left to right as their note-on velocity crosses 64, but how far left and right will be some amount less than maximum.
I'm sure you will think up many other situations for controlling synthesizer parameters with MIDI commands. However, it is important to understand that SoundFonts that use modulator routings will not behave as intended when played through older AWE and SoundBlaster Live cards. They will still sound correctly otherwise, but any added or changed modulators will have no effect.
Special thanks to Frank Wen, author of the fabulous Fluid SoundFont, for his help in identifying the Audigy SoundFont bugs, and providing me with repeatable examples.
Ethan Winer is a reformed rock 'n' roll guitarist who sold his successful software company in 1992 at the tender age of 43 to learn the cello. Since retiring he has produced two popular Master Class videos featuring cellist Bernard Greenhouse, and five cello CDs for Music Minus One including a recording of his own concerto.
Ethan has, at various times, earned a living as a studio musician, computer programmer, audio engineer, composer/arranger, technical writer, and college instructor. He has had more than 50 feature articles published in computer, audio, and music magazines including PC Magazine, Electronic Musician, Audio Media, Computer Language, Microsoft Systems Journal, IBM Exchange, Strings, Visual Basic Programmers Journal, The Strad, Recording, and the online magazine ProRec.
Besides writing and recording numerous pop tunes, Ethan has composed three pieces for full orchestra, all of which have been performed. He lives in New Milford, Connecticut. When not watching reruns of The Simpsons, Ethan plays in the Danbury Symphony Orchestra, and has served as principal cellist with the Danbury Community Orchestra.
Entire contents of this web site Copyright © 1997- by Ethan Winer. All rights reserved.