 CD Label Notes:
| www.ethanwiner.com - since 1997 |
Using Visio Professional 5.0 for CD Labels and Artwork
by Ethan Winer
After trying a number of CD label programs - and rejecting all of them as being inadequate for the job - I now use Visio Professional 5.0 for designing CD labels, cover cards, and back panels. Visio Pro is an excellent layout program, albeit overkill for CD work. But the one feature that makes it superior to all other such programs is that it displays a grid, so you can easily control exactly where the text and various graphic elements will be placed on the label and card stock. Further, most CD label programs are tied to a particular brand of blank label stock, thus requiring you to purchase that brand forever - and hope the company never goes out of business!
Accompanying this article is the VisioCD.zip file (160 KB) that contains one blank template each for CD labels, cover cards, and back panels with spine text. Also included in the ZIP file are examples from my cello concerto CD showing a typical use for each of the three templates.
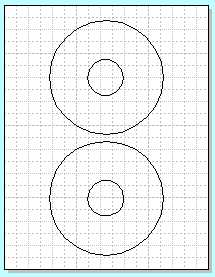
CD Label (BlankCD.vsd)
The CD label blank has two pairs of circles that define the inner and outer areas of a CD, aligned for use with the 2-up Neato CD label stock available from www.neato.com. The CD label outline circles are locked to prevent them from being moved accidentally, and are also defined to not print. Because the circles are placed exactly at the boundaries of the CD printable area, you should leave at least a little margin and not place text right up against them. I left the CD labels blank, as opposed to filling them with a color, so you can print them on colored label stock. It is easy to add a colored background: right-click on each outer circle's edge and select Format..Fill. Then pick a background color and, optionally, a fill pattern.
CD Label Notes:
1. The CD label alignment should be correct for most printers, but you may have to move the circles slightly up/down or left/right to work with your printer. In that case you must first unlock the circles: First, right-click on each circle's edge, and select Format..Protection..None and click OK. Then right-click the circle's edge again and select Format..Behavior, and uncheck the "Non-Printing Shape" box. Next group the circles (see Note 2 below) so you can move them all at once. Finally, move the locked group of circles slightly, print the page on a piece of plain paper, and hold the paper up to the light under a sheet of blank CD label stock to verify the alignment. Once you are satisfied, change Protection back to All for each circle, set the circles to be Non-Printing, and save the template file to disk. It doesn't matter if you leave the circles grouped or not.
2. If you want to print two or more copies of the same label, you
can copy a completed label to the other blank area rather than have to design it twice.
First lock all of the fields together into a single group to preserve their relative
positions. To do this press and hold the Shift key, then left-click on every field, line,
background, photo, etc. in turn. After clicking the last field, pull down the Shape menu
and select Grouping..Group. Once you have locked all of the fields into a single group,
you can copy the entire label to the other blank area. To copy an object in Visio (in this
case, the complete label), press and hold the Ctrl key and then drag the entire label to
the new position. You can increase Visio's magnification to help get the new placement
exactly correct.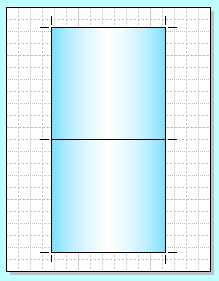
3. If the alignment circles disappear while you are working on a label, right click somewhere on the foreground (the part that's hiding the circles) and select Shape..Send to Back. This will make the circles visible again.
Cover Card (BlankCard.vsd)
The blank card template has two printable surfaces, with one placed above the other. Crop marks are provided to trim the card to the exact size with a straight-edge and razor blade (see below). I designed the box properties to have a light-blue gradient background color, though this can be easily changed: Right-click in the box area and select Format..Fill to select from a variety of colors and patterns. You can also add lines, photos, and other graphic objects to these templates, and of course text in any size or font. As supplied this template yields a two-sided card, with the inside blank. You can also design inside panels for the card, which gives a total of four surfaces, though you'll of course have to print on both sides of the same card stock. The card is centered exactly on the page, to make it easy to print on both sides and have the inside and outside line up.
After printing, you should lightly score the card stock on the
dividing line, and fold the card in half. Then you can cut away the excess on the sides. I
use a piece of heavy cardboard as a cutting surface (which also protects my table), with a
metal straightedge and sharp razor blade to cut the stock. I find this gives me better and
straighter edges than a paper cutter. If you are using only the front and back, and not
also printing on the inside surfaces, you can use photo mount spray adhesive to keep the
"booklet" closed.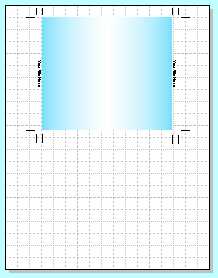
Back Panel and Spine (BlankSpine.vsd)
Like the cover card, the back panel and spine template uses a colored gradient that you can easily change. Text fields are already in place for the spine text; simply double-click in the field and replace the text with your own. Also like the cover card, crop marks are provided, and you should lightly score the border between the back panel and the spine edges with a sharp razor blade before folding.
The Samples
I intentionally used a low-resolution photo for the sample cover, to keep the file size small for fast downloading. However, Visio can import very high quality images in any of the popular graphic formats, and they will print at whatever resolution your printer can handle. I also limited the text fonts to Times New Roman, Arial, and Symbol, since every PC has those fonts.
Entire contents of this web site Copyright © 1997- by Ethan Winer. All rights reserved.